User journeys are a beta feature that allows you to walk your users through on solving their issue, rather than having to read static/GenAI text instructions. As it’s beta you need to paste in JSON which can be messy for content creators.
In this video you can learn how to create your user journeys without having to touch the JSON.
Converting to/from hex in watsonx Assistant is easy if you use an extension. If you don’t have that choice then you need to get creative in how to do it. In the video I am going to cover the following.
Converting Text/Integers to and from hex code.
Show how to create temporary variables within your action.
Sub-action notation to help your content creator fill out correctly.
This is a common question that comes up and there is no simple answer. So I have created this video to walk through how to do this. The video also covers a couple of topics.
How to modify an extension where anyOf, oneOf or allOf are used.
Revisiting the earlier post on non-blocking options. One of the issues that comes up is that it can be messy to have multiple actions for a single function. The other issue is that user inputs can accidentally trigger such survey events. So you want to prevent that.
So the first part is simple. You just move them into one single action. You can even have the sub-action be the handler for the responses.
Within the json the label is what is shown to the end user. The text piece is what gets sent silently to Assistant. Swapping out the thumbs for UUIDs allows you to create training data that can never be triggered by the end user. To make it easier I put a word tag on the end so I remember which is which like so:
Now in the training data of your sub-action you add the UUIDs you created.
Lastly you want to have the steps to look for these in your first steps. Those steps should have a condition statement using the expression editor like so:
Once captured, ensure you finish on that step. Lastly you want to switch off “Ask clarifying question” and “Change conversation topic”.
You now have a poor mans callback. 🙂 I’ve attached the sample skill for you to review.
I keep meaning to get back to this blog but various things continue to block. So it’s 4am and I’ve nothing to do, so time to put in some updates.
Blockers
The main reasons to why I am so quiet.
I am much closer to the magic of how watsonx Assistant is made. So it’s harder to find stuff to blog about that I know will end up as a feature later (case in point, my earlier blog post).
My current work carries more potential commercial value, adding another layer of complexity to what I can publicly share.
The latest version of watsonx Assistant is designed for non-technical people to do much cooler stuff easier than before. Trying to find anything useful rarely warrants a whole blog post. So I’ve been posting to Stackoverflow as needed.
Highlights
Earlier in the year I received the IBM Tech 2023 award. It’s awarded to the top talent in IBM. I got a chance to go back to Dubai and meet many exceptional people in IBM across the world. That event really puts in perspective of how many moving parts there are in IBM and how there are numerous people excelling in those parts.
More recently I was humbled to receive the Culture Catalyst Award for my work on watsonx.ai and watsonx Assistant. Helping others to build solutions that matter. The award is given to culture leaders and role models who exemplify our purpose, values, and growth behaviours, working to activate our culture and drive growth.
I’ve also helped build a worldwide program focused on helping existing customers fix gaps in their Assistant and migrate easier to the latest version. Helping to oversee numerous experts in different Geos execute this for customers has been very rewarding.
On the personal side I got to visit Japan for my son. A fantastic country, but I was more impressed with how fluently and relaxed my son was there. His self study of Japanese and culture paid off for his first visit.
What now?
I’ll try to add updates as I can. If there is something in particular you want let me know (or just post on Stackoverflow or TechExchange. I can also be found on Bluesky.
When working with extensions in Watson Assistant just using the standard UI can be cumbersome to do deep dive analysis on why your extension is not working as expected.
You can use the browsers inspector to look at what is sent and received. You do this by going to the network tab, select “Response” then filter by “callout”. Once you get to the line where callout is mentioned remove the filter and then you can see all the parts.
For the video demo below I created a sample extension that pulls jokes from “I Can Haz Dad Joke” via their API. The sample extension is attached.
This is a common request that comes up often with the new Watson Assistant.
This is where you offer options at the end of an action which can link off to another action. Using normal options forces the user to respond to the buttons and prevents them leaving that action.
Another use case is asking the user if they were happy with the response. In this example I’m going to show how to do a thumbs up/down as a follow up.
First we need to create a Thumbs up and Thumbs down intent. Both are exactly the same. It is one training example, the emoticon 👍 or 👎. One step that says if they had a positive or negative response.
Next click the options on the action and make sure to switch off “Ask clarifying questions”.
Same for thumbs up/down and survey later.
Once you have created those two actions. Next is the survey action. This should contain no training questions and the settings above switched off. This is to prevent it triggering except called from another action.
The step you are going to select the </> button to show the json and replace with the following:
Important: In a real world production instance it is not good practise to have a thumbs/up down after every response. As this reduces the users confidence in the system.
Imagine having a customer support person asking for validation after every answer given. You wouldn’t trust their response either.
The other part of it is that often end users will make their thumbs up/down from an emotional response, and not a logical one.
If you really need to do this, then I recommend to put a confidence level into survey. So it doesn’t trigger unless the confidence level is very low. A better option is to use the custom survey demonstrated in the Lendyr demo.
One of the most important parts of a conversational system is to ensure that your end users are getting the most benefit out of it. To do this requires looking at patterns in your conversation logs. It can be time consuming.
A common approach is to put markers into your nodes then look for those entry/exit point markers. But a user question can hit multiple nodes + slots across multiple log lines. Making it tricker to see. Here is a couple of approaches to try and easily get information on your complex flows.
For this demo I am using the default demo skill in Watson Assistant to generate logs. I have created a number of simple conversations. A couple demonstrate a issue with how the user may interact. I have also supplied the example notebook and files for you to try out.
Creating the graph.
For generating I first need to convert the log to a graph format. The easiest way to is look at the nodes_visited column in the logs. Here is an example of a user making a reservation.
The second part is the whole interaction the user had in trying to book an appointment. It’s still not that readable. So I converted these over to make a little more readable.
slot_ = Take the variable that the slot object depends on.
node_ = Take the condition for the node in the skill.
frame = Top level slot node (not shown above, it’s part of the skill node attributes). Took the condition of the node.
response = This is the node that responds to the end user, or part of the slot. Added “response to: <parent node name>”
handler = Left the same.
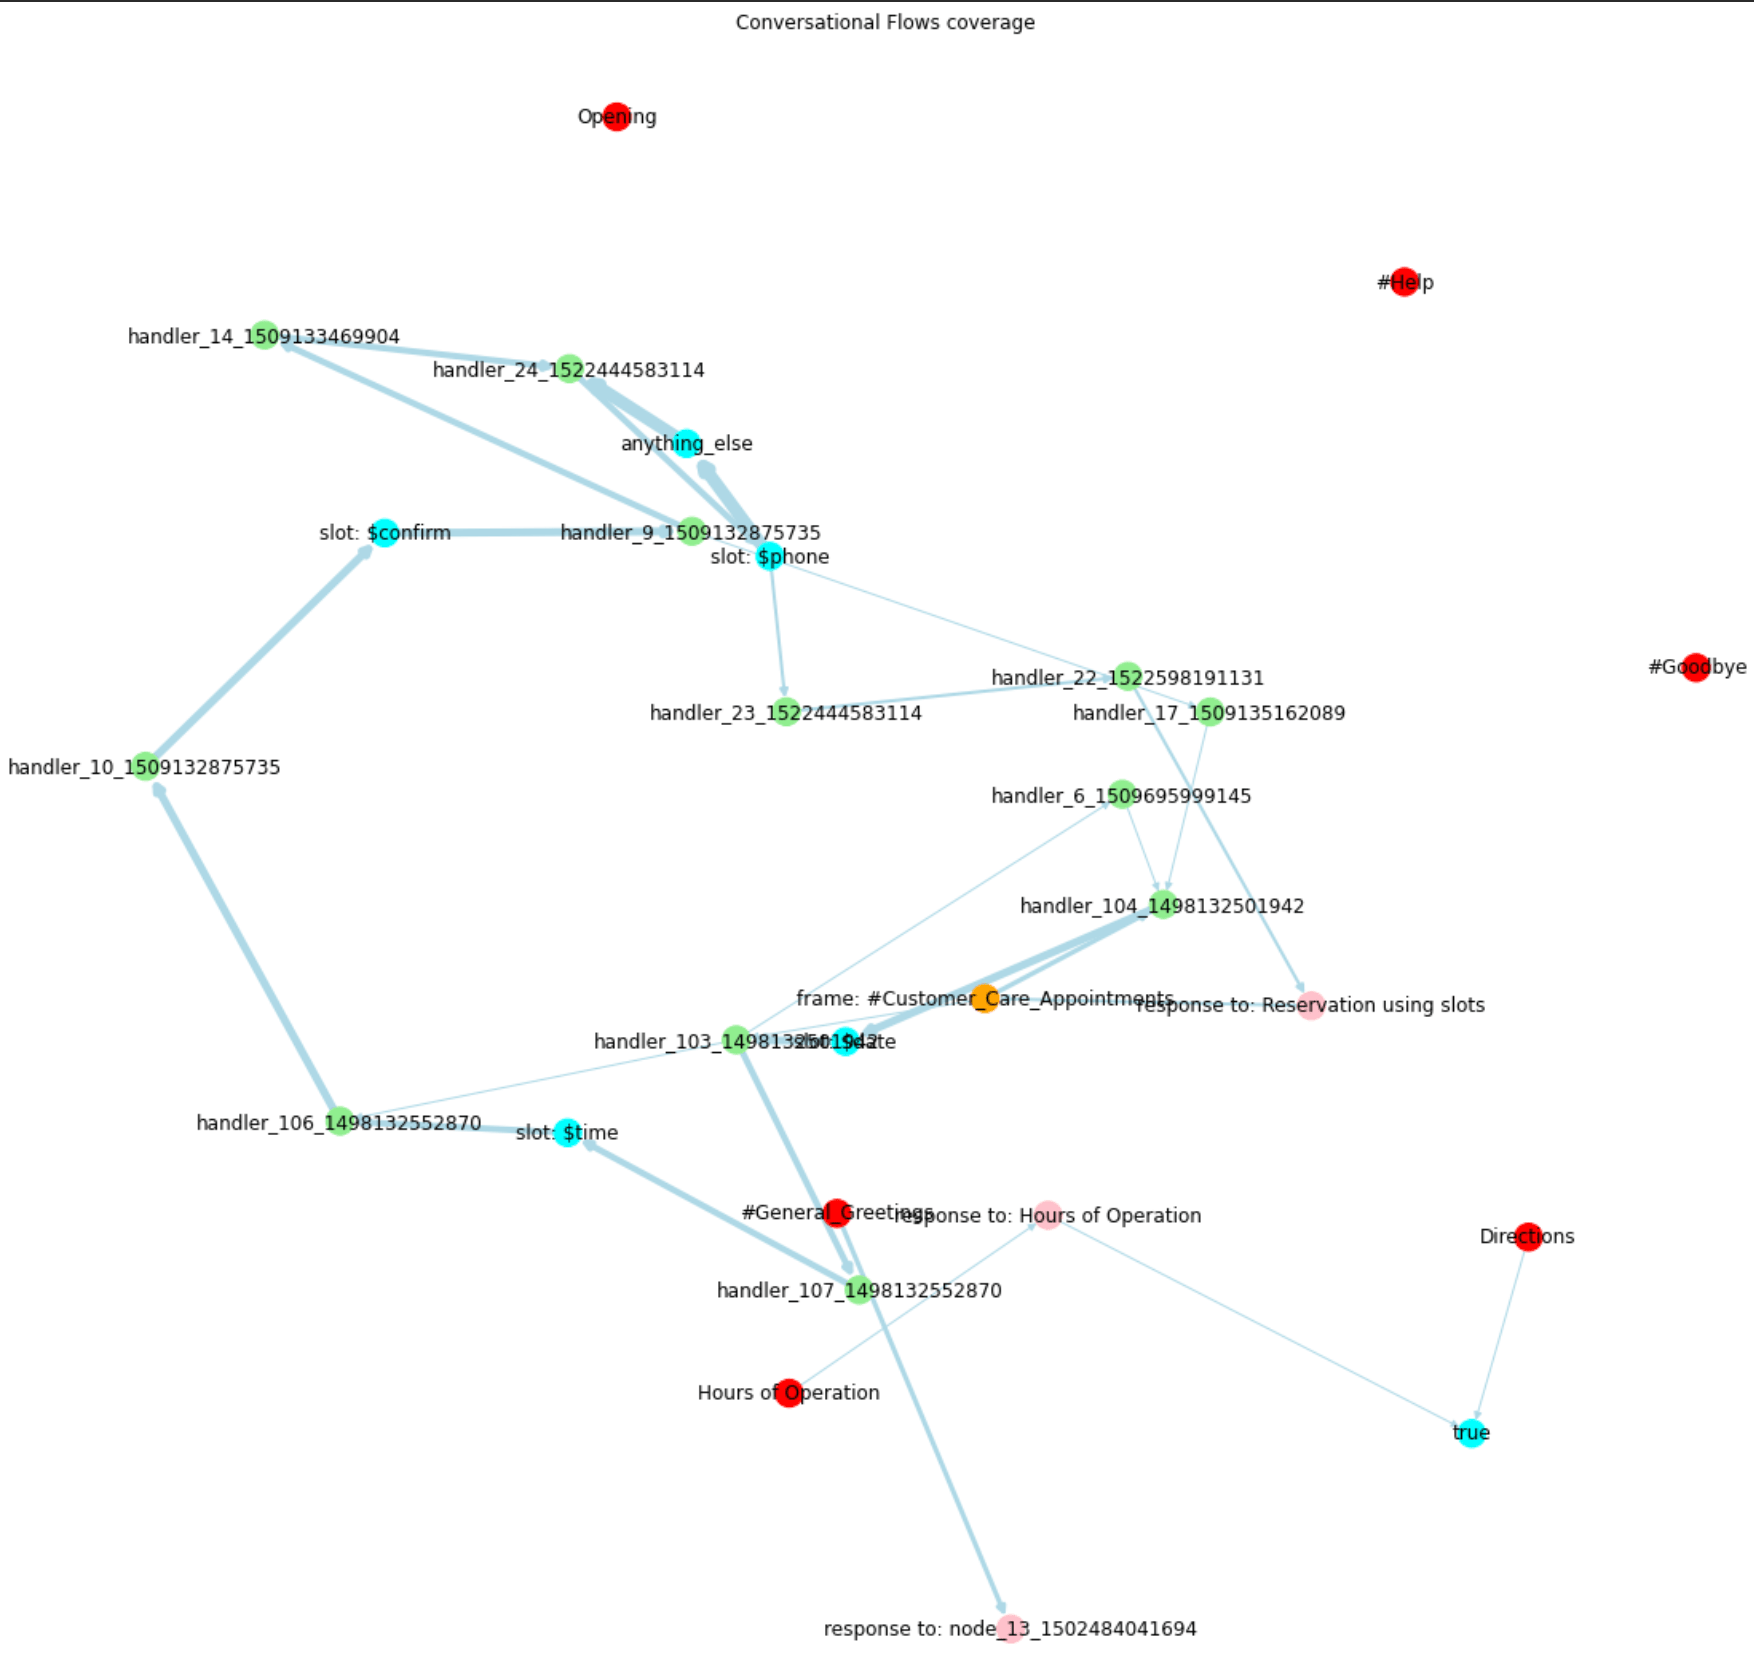
Once this is done I started by converting the chain to Graph nodes and edges. For each time an edge is repeated a count is incremented to the edge object. You end up with this.
Red nodes are entry points to a single flow. Orange is a flow which could have been entered though other parts of the conversation. Blue are the slot values. Pink is a final response to the user from the flow.
As you can see it’s still a mess!
By selecting the entry point node you can delete all other nodes that do not have a path to it. In this case I selected “frame: #Customer_Care_Appointments”. This was generated.
Still a bit of a mess and not easy to see how the paths are flowing through the booking appointment. NetworkX was designed more for analysing graphs than visualising them.
Graph to Sankey
So using the generated graph data I moved it over to a Sankey. The nice thing with plotly is you can easily move the flows to see what is going on. Here is what is generated using the graph information from the last image.
Edge colors are red where there is more output from a node than there is input. In a normal conversational flow it should be fairly static if well trained. Not all red is an issue though. Taking the two biggest we can use these to drill down to a root cause.
#1
This is showing a lot of users are not progressing through the phone section of the flow and are going into a loop. As the second part is much smaller it would suggest that people are giving up on the flow. Looking through the logs shows the following pattern.
Clearly the end users are having problems trying to enter in a valid phone number. So this is something that should be looked at in resolving.
#2
You can see three inputs into the handler before it passes over to the “Ask for date” slot. This isn’t an issue as there are three conditions this could happen.
User supplies a date when asking for the appointment.
System asks the user for the date.
User asks to redo the appointment at final confirmation.
The handler is doing what it should be doing.
Conclusion
So this example is showing just one way to approach this problem. I’d be interested to hear how others are dealing with this.
I normally do up these small and quick projects to help practice technologies I work with. Also to keep me a bit sane.
For this fun little project I thought about creating a chatbot that can translate a simple conversation into a format that can be understood by a quantum computer.
The plan is to build a Grover Algorithm circuit that will determine the best combination of people who like/dislike each other.
The architecture is as follows:
Breaking down each component.
IPad App (Swift): Why? Because Javascript annoys me. 🙂 Actually creating apps is very easy and swift is a lovely language. If you haven’t coded in it and want to, I recommend the App Brewery training.
Orchestration Layer (Python/Flask): My focus was on speed and python has all the modules to easily interact with everything else. Perfect for backend demo.
Watson Assistant: This is to handle the human interaction. Also to pull out the logical components and actors mentioned in the conversation.
Equation Generator: When the user asks to solve the problem, it translates the Watson Assistant results to an equation that Qiskit can run on.
Quantum Engine: This is just a helper class I created to build and run the quantum circuit, and then hand the results off to the reporting NLP. Of course what comes back is all 1’s and 0’s.
Reporting NLP: This takes the result of the quantum computer and converts it into meaningful report to the human. This is then handed back to the iPad App to render.
All this was built and running in a day. It’s not because I’m awesome 😉 but that the technology has moved forward so much that much of the heavy lifting is handled for you.
I’m not going to release the code (if you want some code, why not try pong? I wrote over the weekend). I will go over some of the annoyances that might help others. But first a demo.
This is a live demo. Nothing is simulated.
Watson Assistant
This was the easiest and most trivial to set up. Just three intents and one entity. The intents detect if two people should be considered friendly or unfriendly. The names of the two people is picked up by the entities. The last intent just triggers the solve process.
Equation Generator
This is a lot less exciting than it sounds. When sending a formula to qiskit it needs to take it in a format like so:
((A ^ B) & (C & D) & ~(D & A))
Which is something like “Bob hates Jane, Mike likes Anna, Mike and Bob don’t get on” in normal human speech.
Each single letter has to equate to each person mentioned. So those have to be kept track of as well as the relationships to build this.
Quantum Computing
So Qiskit literally holds your hand for most of this. It’s a fun API. If you want to start off learning Quantum Computing I strongly recommend “Learn Quantum Computing with Python and IBM Quantum Experience“. It focuses from a developer perspective, making it easier to start working through the math later.
To show how simple it is, Qiskit has a helper class called an Oracle. This is literally all the code to build and run the circuit.
What you get back is mostly 1’s and 0’s. You can also generate graphs from the helper class, but they tend to be more for the Quantum Engineer.
Reporting
I used the report generated by Qiskit. But as the results are all 0/1 and backwards. I translate them out to the ABCD… and then added a legend to the report. That was all straight forward.
The tricky bit came in sending the image back to the iPad app. To do this I converted the image to base64 like so (Using OpenCV):
def imageToBase64(img):
    b = base64.b64encode(cv2.imencode('.png', img)[1]).decode()
    return f'{b}'
On the Swift side of things you can convert the base64 string back to an image like so.
func base64ToImage(_ base64Text: String) -> UIImage {
    let imageData = Data(base64Encoded: base64Text)
    let image = UIImage(data: imageData!)
    return image!
}
Getting it to render the image in a UIViewTable was messy. I ended up creating a custom UIViewTableCell. This also allowed to make it feel more chat-botty.
When I get around to cleaning up the code I’ll release and link here.
In closing…
While this was a fun distraction, it’s unlikely to be anything beyond a simple demo. There already exists complex decision optimization that can handle human interaction quite well.
But the field of quantum computing is changing rapidly. So it’s good to get on it early. 🙂